Friday, March 29, 2013
Battletech Battle Report
I have a fresh new Battletech Battle Report for your reading pleasure complete with story and pictures. Please enjoy the battle report and add some feedback if you will.

Thursday, March 28, 2013
Hobby desk update
Here are a few items I have been working on the past few days.
New Vehicles
Last Christmas season my good friend Masta Cheef gave me the gift of Battletech in the form of a pair of Harasser Missile Platforms. I figured I need to get these vehicles assembled and into my regular vehicle inventory so they can be used in upcoming games. Masta Cheef loves destroying my vehicles as much as I love trampling his with assault mechs.
Assembling the models was easy. I wondered if the SRM launchers were actually mounted to a turret so I stopped before gluing the launchers permanently in place. I did some research and sure enough there is a turret. Since the vehicle has a turret and I had some small magnets which would work perfectly I magnetized the turret. I have not added the hover base yet and may not at all, it sometimes gives the model balance issues on mapsheets.


In the world of Battletech
New Vehicles
Last Christmas season my good friend Masta Cheef gave me the gift of Battletech in the form of a pair of Harasser Missile Platforms. I figured I need to get these vehicles assembled and into my regular vehicle inventory so they can be used in upcoming games. Masta Cheef loves destroying my vehicles as much as I love trampling his with assault mechs.
Assembling the models was easy. I wondered if the SRM launchers were actually mounted to a turret so I stopped before gluing the launchers permanently in place. I did some research and sure enough there is a turret. Since the vehicle has a turret and I had some small magnets which would work perfectly I magnetized the turret. I have not added the hover base yet and may not at all, it sometimes gives the model balance issues on mapsheets.

The red marker gives away the presence of where I have placed a magnet. I used very small magnets which were 1/16 x 1/32 in size. The magnets stay connected quite well for their size.

Turret twisting is a go. I have no idea how these vehicles are going to fire into their left or right side firing arcs. Who needs the rear spoiler anyway.

In the world of 40K
Painting Space Marine heads
If you have read some of my previous posts featuring the WIP shots of my Space Marine Devastator squad all but seven members of the squad have their heads missing. The sergeant has a flesh head which is not a concern and two squad members have their heads attached as I could not remove them prior to paint stripping the models. Blood Angels Devastator Marine helmets are blue compared to the rest of the army so they have to be painted separately. I do this to avoid having to paint blue over the red prime coat. The two Marines with heads were carefully covered to avoid any red spray applied.
Painting heads attached to a chest is easy, but what about painting detached heads? I tried using pins in the necks so I could hold the heads in place with my fingers but this did not work. Neither did holding the pins with some pliers or even placing them in styrofoam. The heads would continuously spin which was not helpful. I was not in the mood to go purchase cork material either.
An Ingenious and Cheap Idea
Then I thought of an idea from a bit of excess sprue left over from a new model. Using the out lining portion of a sprue as a base and leaving some for holding and structure I made a pallet base to attach and paint the heads on. I originally was going to super glue the heads to the side of the sprue, but I saw the round joints on the sprue would work perfectly as a base to mount the heads upon with a bit of super glue. I can easily remove the heads at the base where they are glued and attached them to their respective models and no one will notice.
This idea has worked great. I have been able to prime them much easier as I used a brush on white primer and a brush on blue paint. I can add ink to the heads just as easy and paint them with ease. Heck I hate painting eyes, but I can hold this sprue bit steady and paint them much easier than a model in hand.

One area I am still at odds with is the blue ink I have applied to the heads so far. I could not find a blue ink which is close to the Army Painter Ultramarine Blue so I used the closest color being Prussian Blue ink. I am not using the inks as a wash necessarily, but rather as an enhancement to the overall color. The ink becomes the next layer and gives the armor the shine and color of the Emperor's finest.
The blue heads on the Devastator Marines have a 1:1 distilled water/ink mix applied. I felt this was maybe too heavy and mostly it gives off a definite purple hint in natural light. I tested out a 10:1 ratio which appeared too light and even tested a 2:1, 3:1, and even a 4:1 ratios. Oddly enough the 2:1 and 3: 1 ratios appeared the same while the 4:1 appeared a bit dark for my tastes. I even tried mix some chestnut in as I do with red ink, but it did not work at all, however it produced a wonderful teal color i might be able to use for plasma weapons.
For clarity here is the Devastator Marines before and after the original 1:1 ratio was applied to the blue paint.
 |
| Blue helmets without blue ink applied. |
 |
| Blue helmets with blue ink applied. Replace the Sergeant's auspex with a mic and the bolter with a guitar and he is platinum. |
Here is a close up of the heads on the sprue. The middle helmet and the helmets adjacent to it have had ink applied with 2:1 ratio. You can see they have a slight purple tint, but they look good. The purple tint might only be showing in direct light focus as the lower row does not have the light focused directly at them. Perhaps after painting the various other parts oft the helmet the purple may become less noticeable or naturally work itself in. There might be a way to tone down the blue ink a bit, but I am unsure of how. I could apply highlights, but I tend not to on armor. I can try to apply some water across the heads to perhaps wash some of the ink away leaving the stained portion behind. If this works it should remove the purple tint, but it loses the shine which matches the rest of the armor the ink application gives.
 |
| Heads On A Sprue! |
I presume I will probably decide on using the 2:1 ink ratio as I would rater not wait longer or fall into another viscous cycle of the inability to decide. If I don't get any ideas I will either have made a decision or left the heads of as usual.
Check back very soon for a new Battletech Battle Report.
Tuesday, March 19, 2013
WIP Devastator Squad and other upcoming units.
Send The First Squad To Help!
Here is how the Devastator Squad appears as of now.
I have moved past using black paint to painting the metal portions and the parchment/purity seals. I initially used black and then a metal dry brush over vents and coils, but dry brushing causes a lot of extra clean up. With some consulting I have moved to painting those areas with metal on top of black and then applying a black wash and then a second black wash.

Here is the sergeants pack. The picture might not be able to give the full detail of the vents yet.

I have done the coils on the missile launchers. I am deciding how to go about painting the missile launchers themselves, but once I have an idea they should be no trouble.

Here is proof the other half of the Devastator Squad has made it into production. I have the heads being painting separating along with the bolters which both are part of the post painting assembly. I have tried pinning heads to paint them and it has not been all to helpful so my next idea it to glue the heads to some scrap sprue and hope they hold while painting. Another noticeable detail is the ink wash is heavier than the first half of the Devastator Squad, but I like it and can easily apply it to the first half if needed. Ideally these Marines do not need heads or weapons, but visually they say adding them is a better overall gaming experience. What do they know anyway.
 |
| Squad portrait day. |
Everyone knows the bolter Marines are cannon fodder and even the Sergeant eventually is as well. Eventually I need to come to an agreement upon base flock. I used plain green paint and green flock, but I would like to move to something better. I think urban might be better as my Tyranids have a foliage flock base scheme.
I have slowed down a bit in painting, but it was for good reason as I was prepping other models in the background for their initial prime stage.
Send The Second Squad To Help.
 |
| Why send three squads when you can send three priests? |
 |
| Why send three priests when you can send three priests with jump packs? |
 |
| By land, air, or transport, you can send three magnetized priests as one elites choice. |
Magnetizing the priests was a bit of a challenge. The back of the chest armor of a plastic model is easy to drill out, but the metal model is much more difficult. The drills slipped and tore the edges away on all of them a little. The fact the tear is between the armor and the pack, no one should care or notice. The metal models with the metal packs are heavy in their own weight class though.
Send The Third Squad To Help.
For a long time I have wanted to make more Assault Marines and most of all have better assault posses. I can say I want dynamic poses, but how long can I use the world till it becomes like the word pop, lol. I have about 26 Assault Marine models to work with, but for the meantime I only assembled models with the basic bolt pistol and chainsword loadout.
Here is a selection of some new poses for my Assault Marines and a brief explanation of the various poses.

Left - Is focusing with his bolt pistol with his chainsword ready to swing in a wide sweeping angle.
Middle - Is advancing with chainsword raised in challenge.
Right - Slows momentarily to select a new threat to tear apart. The idea of twin chainswords gives the model the extra awesome factor.

Left - Advancing bolt pistol raised while bringing his chainsword up.
Middle - Advancing with chainsword raised with a more menacing look while detaching his bolt pistol from a magnetic grip on his thigh.
Right - Slows momentarily bolt pistol raised in his left hand suppressing the enemy while ready to toss a frag grenade held in his right hand at the suppressed enemy.
I did purchased a new small reinforcement unit for my Blood Angels army and some new large reinforcement units for my Tyranid army. These units should be shown soon enough, until then I have magnets to apply.
Tuesday, March 12, 2013
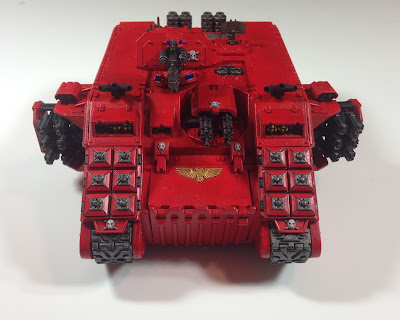
Land Raider Crusader Finished
I still have a small list of minor things to do to it, but nothing major at all. I need to add the searchlight, correct a few paint mistakes on the exterior and the interior. The interior has to made till a matching dropper bottle color is off back order at a local retailer. Finally I need to purchase a new foam tray to protect it during future storage and transport. Otherwise this tank is done and I am happy how it turned out.
Here is the Land Raide Crusader as of now.


One interesting fact is I have not used a single drop of Citadel paint products on them yet. All of the Missile Launchers are pinned either to the chest or to the launcher itself. Yes the two Marines on the left will have heads. Like the ink I use on the red spray paint I believe I have found a suitable ink to use on the blue paint.
With the help of a collection of ideas, opinions, and thoughts from outside sources I have decided to assemble and paint the other half of the Devastator squad. By the end of the month I will have a full Devastator squad. Yes they will all have heads.
On the side I have added a few more magnets to my Baal Predator for even more versatility. I am also in the process or rebuilding, rearming, and reposing my Assault Squads. There will more new stuff to show very soon.
Here is the Land Raide Crusader as of now.

You can see the horrible mold on the right Assault Cannon. I really likes how the blue glass sights turned out. I wonder if the smoke launchers stick out in black instead of matching the metal pieces.

The front lower right portion of the hull near the treads is the only real area which needs a minor paint touch up. The cupola has some, but I don't think they matter much to most eyes.
 |
| Bless the brass and glue holding metal to plastic. |

The screen on the Multi-Melta shield is kind of messed up paint wise. I figure it either works or may no longer work anymore as the machine spirit tends to fire it most of the time.
Eventually I will tackle my other Land Raider in the same fashion, but it should paint up much faster. Currently it is in the last stages of paint stripping. Older Citadel spray paint apparently is VERY difficult to remove right along with cheap auto spray paint. However I experimented with Super Clean in the purple bottle and it works great. Super Clean compared to simple green it is ten times better and doesn't hurt plastic. I might do a visual documentary on how good it works in the future.
Next in line is my Devastator squad.
|
| Sergeant Sir Point to nothing useful and his Marines of Martial Art Mastery. Damn that is one sweet |
With the help of a collection of ideas, opinions, and thoughts from outside sources I have decided to assemble and paint the other half of the Devastator squad. By the end of the month I will have a full Devastator squad. Yes they will all have heads.
On the side I have added a few more magnets to my Baal Predator for even more versatility. I am also in the process or rebuilding, rearming, and reposing my Assault Squads. There will more new stuff to show very soon.
Wednesday, March 6, 2013
Battle Report - Dark Angels versus Tyranids 3000 Pts
Last Saturday I was originally going to leave very early for a two hour drive to attend a board game event, but the early snow scared me off. I recovered and decided to go to the normal local game night ordeal. In preparation my Blood Angels needed a new list because most of the heavy support choices are either being paint stripped or being painted. I also decided to bring my Tyranids out of hiding and made two very similar lists for my Tyranid army. I showed up with two armies to game with.
When I finally arrived I saw one game being setup, another game in preparation and one player still waiting for a game. There was also another player I met in the parking lot who arriving at the same time as me and to my amazement he had a Tyranid army. Eventually I suggested to the waiting player if he could up his forces to a points level to 3,000 so the other Tyranid player and I could join against him. This gets a game started and no one left waiting for a game. The waiting player had Dark Angels and he had no issues being able to up his forces, new Dark Angels codex and more points I could hear the cash register sound. :) This idea worked perfectly as I got to game with two new players and I got to use my Tyranids again in the new six edition environment with a fellow Tyranid player.
Proceed past the break to read this large battle report.
Thursday, February 28, 2013
Massive reorganization and rebuilding of my Blood Angels
It all starts with a spark.
When I started painting my Land Raider Crusader I was still undecided on a decision to revamp my entire Blood Angels army. I believe the noticeable difference in color from the original Land Raider and the Crusader helped provide the spark. The Devastator squad has since been paint stripped of all original color to match the new red color of the Crusader. If the Crusader provided the spark and the Devastators provided the fuel, then the original Land Raider provided the flame as it is now being paint stripped completely. The original Land Raider will be rebuilt and repainted to match along side the Crusader.
The Land Raider Crusader is almost done and it will make its blog and game debut soon. In the meantime I am working on the Devastator Squad which is painting up rather fast. With this added speed in mind I am beginning to look ahead for the best candidate.
I am strongly considering the Assault Marines, but I want to reorganize and rebuild them to suit dual roles which will require a lot of magnets. I have a large over thought document to help me plan the squads out, but I must post about them later to layout my plans and get some feedback as to good or bad ideas. The biggest reason to work on the Assault Marines is to get rid of the Leman Russ box which has been their home for the past decade or so. The Leman Russ box and some bits are from a long abandoned, never used, and sold Imperial Army. I would have never known allies were in the mix back in 2009.
When I started painting my Land Raider Crusader I was still undecided on a decision to revamp my entire Blood Angels army. I believe the noticeable difference in color from the original Land Raider and the Crusader helped provide the spark. The Devastator squad has since been paint stripped of all original color to match the new red color of the Crusader. If the Crusader provided the spark and the Devastators provided the fuel, then the original Land Raider provided the flame as it is now being paint stripped completely. The original Land Raider will be rebuilt and repainted to match along side the Crusader.
The Land Raider Crusader is almost done and it will make its blog and game debut soon. In the meantime I am working on the Devastator Squad which is painting up rather fast. With this added speed in mind I am beginning to look ahead for the best candidate.
I am strongly considering the Assault Marines, but I want to reorganize and rebuild them to suit dual roles which will require a lot of magnets. I have a large over thought document to help me plan the squads out, but I must post about them later to layout my plans and get some feedback as to good or bad ideas. The biggest reason to work on the Assault Marines is to get rid of the Leman Russ box which has been their home for the past decade or so. The Leman Russ box and some bits are from a long abandoned, never used, and sold Imperial Army. I would have never known allies were in the mix back in 2009.
The other night I examined the inside of the Leman Russ box which is the current home to a bunch of models and bits and to my surprise I discovered the following. I knew of most of the items in the box, but was surprised at how many of certain items were in the box. I usually bring this box every time I go to a game.
The Leman Russ box contents
The Leman Russ box contents
3 Forgeworld Blood Angel Rhino door sets
Forgeworld errors in my favor.
1 Pewter Chaplain with jump pack
Received free from a friend and serves as the current Reclusiarch when needed.
3 Pewter Sanguinary Priests
1 is from the old 3rd edition Blood Angel Honor Guard box set who served as Sanguinary Priest and then a Captain with twin lightning claws which were eventually removed. The other 2 were ordered to serve as Sanguinay priests never releasing they were the same.
1 Pewter Emperor's Champion
Purchased long ago and serves as the current librarian who is prone to dying often.
5 Assault Marines
The remnants of an old 3rd edition Blood Angel Honor Guard and now serves as Assault Marines or Vanguard Veteran Marines when needed.
10 Tactical Marines with the same leg, chest, and backpack pattern and no heads.
Purchased during 3rd edition when Tactical Squads were in abundance. All of my Tactical Squads were built with a theme in mind. I have since abandoned the themes I suppose, but I could make this Tactical Squad a hazardous operations squad since they have all the vents and coils.
4 Tactical Marines with various leg, chest, arm, or head, but none are complete.
Spares and duds which never made it into any squad.
16 Tactical Marine legs glued to bases
10 Must be from another Tactical Squad or perhaps extra Assault Squad legs. I never knew I had so many unused without purpose. I know I fight Masta Cheef constantly with no heads and sometimes no arms or other missing equipment, but I don't think I have ever attacked with just metal underwear. I could take five of them to make some normal Devastator marines. Whether this is a good idea or a waste is undecided.
1 Tactical Marine sergeant with pinned Pewter Storm Bolter and chainsword
This was an attempt to copy the same sergeant from the 3rd edition Blood Angel codex. This one needs to be paint stripped and rebuilt with a power sword.
3 Pewter Blood Angel shoulder pads
The stocks are too low sire.
1 Pewter 3rd edition Blood Angel Honor Guard helmet
Unused gem I suppose.
10 Jump Packs
Sounds about right as I have the other five Assault Marines in another box magnetized for Meltaguns.
7 Small infantry bases
No idea.
2 Small slotted infantry bases
No idea.
1 Large infantry base
Probably from a Tyranid model who eventually moved on.
Various Land Raider bits
This Land Raider finally went into a simple green bath so these parts will be assimilated into it.
Various Landspeeder bits
These models will follow suit with the Land Raider, but possibly before or after the Assault Marines.
3 Primed Space Marine helmets, two being pinned
No memory of why they were pinned, unless they were for the Heavy Bolter marines which have no heads.
1 Bolter
Missing the clip.
1 Meltagun
Rare, valuable, has a role with one Tactical Squad which serves as a Sterguard squad.
Various Tactical Marine arms
Some of this might have been moved as spares for magnetizing the Meltaguns.
22 Space Marine helmets
You have NO idea!
It is sad to say I have been carrying all this extra crap with me every game, lol.
The most likely candidate to paint next would be the Baal Predator. This would build and paint the Baal and remove it from the storage box so I can finally be rid of it. The other option is to create the six extra normal bolter Devastator marines.
The main goal is to continue and not get stuck and if the color doesn't match, bath it in simple green.
It is sad to say I have been carrying all this extra crap with me every game, lol.
The most likely candidate to paint next would be the Baal Predator. This would build and paint the Baal and remove it from the storage box so I can finally be rid of it. The other option is to create the six extra normal bolter Devastator marines.
The main goal is to continue and not get stuck and if the color doesn't match, bath it in simple green.
Wednesday, February 20, 2013
Land Raider WIP Part 6
Working, working, working on the Land Raider ...
This will be the final WIP post for this Land Raider so the next post with be the finished model with better pictures as I took these pictures in low light. Keep in mind I do not intend to dirty or weather this model. I have such a huge back log it not in my interest. This model is taking longer, but the amount of paint recipes I have attained will hasten the next model. Anything you might suggest or tip me off to please feel free to.
The Multi-Melta mount has a few details to fix on the back panels, but it is otherwise finished. This I will never allow anyone to touch as it can snap if pulled off in a hurry due to a weapon destroyed result. The magical bond of plastic, pin, and metal I hope will last a long time with care.

I have finished painting the Assault cannons and assembled them to the cupola. The Assault cannon molds were so bad I had to create a plastic card spacer and even then they are slightly bent. The right Assault cannon's top and lower barrel don't even look like barrels. I glued the upper shield to the Assault cannons, but perhaps I should have glued them to the mounting pegs as well. I highly doubt I will bend them to a target during a game.
I painted and washed the tank treads before gluing them to the hull. They are still shiny as I noticed they had black primer showing though so I added a think layer to stop the black primer show through. I will add two layers of wash to the treads to dull them like all the other metal parts. I also found out this glue is great as it is strong and won't give much of a haze at all.
I believe I hate painting yellow and to add to the pile of yellow hate I hate painting black bars on yellow lights. I skipped the yellow bars on the search light which is blue in color, I wonder if I could have done the same with the yellow lights. Much light the search light the small glass view points on the various cupolas are painted using combination of inks and washes.

The Hurricane bolters are painted and placed in the sponsor mounts along with the sensors glued to the tops of the sponsor mounts. I think the Hurricane bolters came out well how I painted them and I have started to add a thin highlight to the black to bring some more focus to the weapons. I am debating on whether to paint the square portions of the ammo bins metal to take more black away, but would this bring attention away from the weapons. The shields which are below need to be added as well.
Oh all the skulls I have painted on this model, the skull on the right access point is the best of them all. I need to clean up the wings a bit more to finish that piece off.

The Frag assault launchers I used some inks and washes to help bring out the individual launcher hatches. They need a bit of clean up, but otherwise they are looking good.

The goal is to have this Land Raider finished by the end of the month or earlier. All of the difficult parts are done its now a lot of clean ups and touch ups and a bit of assembly. Plus a final foam piece for it to be stored in.
Past the Land Raider
Continuing on my current Blood Angel painting whim I examined all of my models to see what would be a good next contender. I thought heavily on the Assault squad, but I have a working one for now. The Ball was the next, but to my demise half of the bits are not cleaned yet. The Landspeeders might be a good one, but I am considering a large paint stripping job to match the new red color.
My final choice was the small Devastator squad. The sergeant and the four missile launchers marines all have easy chest armor to paint and I will mostly paint black and metal. The sergeant has a few other details and his skin color to paint, but otherwise they all should paint up nicely. Oh course there are the eyes in the marines heads, however this thought comes to mind.

I'll skip the heads. Into the stripping progress the Devastator squad went.
Between the Land Raider
In the meantime in between working on the Land Raider and waiting for the Devastator squad I pulled out this lovely and started happily working on it. I was working on my Hive Guard models, but the primer I used was complete crap and it keeps coming off so I will need to strip them and use an auto white primer for a better hold on the metal models.
I have thought about bringing my Tyranids out for a game and this Trygon model usually makes the cut so it was a good choice to try and catch up were I left off. I focused on painting the rest of main grey skin color and the green inner flesh portions ending with lower arm work. I am running out of Badab Black wash so I will need to get a replacement soon in order to wash the grey skin color. It has a head and this particular head is one of the best painted heads I have so far.

This week will end on a good note as Masta Cheef and I are going to have a nice game of Battletech were we casually try to blow the smithereens out of each other's forces. Will BBQ squad show, who knows, stay tuned.
Till next time.
Subscribe to:
Posts (Atom)